Sunday, 26 February 2012

Etsy Stock Take - Week Eight - Best of January.

Etsy Stock Take - Week Eight


UPDATE! Don't post your links here anymore, please click on the link to go over to the latest Etsy Stock Take! I plan to do this at the end of every calender week, so please look out for the newest post!

I'm in the UK for the week spending time with my family (drinking a lot of tea, eating a lot of bacon and slurping as much custard as I can... You know the deal!). So of course I haven't made anything this week for my shop.

Instead I decided to do a best of January post, highlighting my favourite items from the first four Etsy Stock Takes of the year. Click on the photo caption to go directly to the Etsy item.

Ready? Let's go...

Week One:

AlteredIris

 Week Two:

CuteBabyToys

Week Three:

ContempoJewels
Week Four:

BougainvilliersLane

I enjoyed putting that together! I hope you did too. You could be next :)

Until next week,

Kat x


Join me:

I hope that you fellow Etsian's will join me in showcasing your new items each Sunday (or anytime after that really!).  Let's blog hop!

You have 2 options:

1. Write a new post on your blog (telling us about your new items), title it Etsy Stock Take and link back here, using the Mr Linky Blog Hop widget thingy at the bottom of this post.

2. Post a link that goes directly to your new items in the Mr Linky Blog Hop widget thingy at the bottom of this post (you can put up as many as you like!).

I will list the links to each week's stock take on my Etsy Stock Take page. Please go and have a browse!

It'd be lovely if you took a moment to go and check out some stuff that others post below. Let's show our support for each other craftwise!

I'm hoping that my goal of listing one item a week will be a powerful motivator and a source of promotion for us all...

 
What do you think?

Thursday, 23 February 2012

Vintage Cars in Hamburg - Mini Cooper.

Mini Cooper - West Hamburg
I saw this little thing going past the Elbe centre in West Hamburg. So sweet.

Can you read what it says in the back window?

It says:

God save the Queen in this car. 

Heehee!

This is part of my new photography project: Vintage Cars in Hamburg. I now carry my camera wherever I go and I will collect pictures of old cars that I see while out and about. They just make me happy.

  1. Mini Cooper
  2. V.W. Beetle 
  3. V.W. Beetle with vintage skis 

Any nice cars around your way?

Tuesday, 21 February 2012

Feathering my nest - Lux style.

Before

After!


For the last Making Winter blog hop I mentioned that I wanted to feather my nest and make things cosy inside so I could forget about the cold outside. I made little hearts trying to get to know my sewing machine a bit better, while also looking for ways to up-cycle my old beloved quilt.

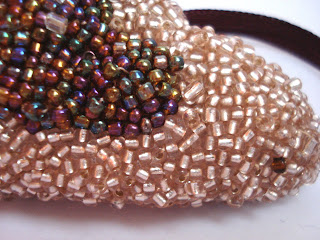
This time I've just finished pimping up one of the hearts. I don't quite know what possessed me, but I just had to cover one side in beads.

Oh, I love the contrast in texture, homely and lux, matt and shiny. And it's so tactile. All my favourite things when it comes to making stuff! This little baby is promised to my sister (do you like it Tala?). That means I'll have to make another for myself!

I think I'm going to submit this for my Monthly Make as well :)

What are you making?


Sunday, 19 February 2012

Etsy Stock Take - Week Seven

Wish I had one at my own wedding!

Etsy Stock Take - Week Seven


UPDATE! Don't post your links here anymore, please click on the link to go over to the latest Etsy Stock Take! I plan to do this at the end of every calender week, so please look out for the newest post!


So, I was very excited last week because I received an enquiry about a custom order for a lovely lady here in Germany. Happily, she bought the listing (a wedding ring pillow) and her item is now ready to go in the post tomorrow morning.

Happy with the success of the little wedding ring pillow that I made last week, I decided to add a listing for the same design: A custom crochet wedding ring pillow: with a couple of custom options: the buyer can choose the colour and the stuffing, divine dried lavender flowers or polyfil pillow stuffing.

I activated the listing last night (I was tres organised! Normally Sunday morning is a scramble to get everything ready for Etsy Stock Take!) and was looking forward to writing this post this morning.

But, guess what?! The item sold!! It was only listed for a few hours... That's never happened to me before... Very excited. This little pillow is going to make it's way out to California.

But first I have to make it! The downside of custom orders is that you cannot just put them in an envelope and post them off... I have a month's wiggle room (I made sure to specify that in the listing) so it'll be fine.

Off I go to check supplies are all there.

What are you making this week? Do you like custom orders or do you feel the pressure?

Until next week,

Kat x


Join me:

I hope that you fellow Etsian's will join me in showcasing your new items each Sunday (or anytime after that really!).  Let's blog hop!

You have 2 options:

1. Write a new post on your blog (telling us about your new items), title it Etsy Stock Take and link back here, using the Mr Linky Blog Hop widget thingy at the bottom of this post.

2. Post a link that goes directly to your new items in the Mr Linky Blog Hop widget thingy at the bottom of this post.

I will list the links to each week's stock take on my Etsy Stock Take page. Please go and have a browse!

It'd be lovely if you took a moment to go and check out some stuff that others post below. Let's show our support for each other craftwise!

I'm hoping that my goal of listing one item a week will be a powerful motivator and a source of promotion for us all...

 
What do you think?

Saturday, 18 February 2012

Gauge Swatches.

The Swatch...Scary!
 The Gauge Swatch Saga

I would love to make a garment that actually fits someone! But I'm a bit intimidated by the whole thing...

Above you see a swatch that I've been working on for a waistcoat that I am making for Marmee, I hinted about it in my last post. It's the second attempt at getting gauge and still not bang on. Grrr... I think it's the closest I can get. Check out the Ravelry details to see more about the pattern I'm using.

So here's some numbers:
The pattern specifies a gauge of:

21stitches x 28rows is 4”x4” with 4mm needles.

The closest to that I can get is 22sts x 24rows to 4”x4” with 5mm needles (the swatch pictured above).

So, in my head it means that the waistcoat will be a little bit wider and a bit shorter than the measurements of the pattern because the number of stitches is more and the number of rows is less than the pattern requires per 4" = my first mistake!!

In fact, it means that 21sts (pattern gauge) is a little bit less than 4" in my swatch. So the waistcoat will be a little bit narrower. And 28 rows (pattern gauge) measures more than 4" in my swatch, so the waistcoat will be a little bit longer than the pattern.

I've discovered that I need to think about the actual length rather than the number of stitches/rows, then things are more logical to me.

You live and you learn right?!

I would not have figured this out without the very kind help of the Ravelry community, cannot praise it enough. Thanks all!

I'm going to cast on now... *excited!*

Update: I just read a VERY helpful and informative post on this topic over at Zilredloh. Go check it out!


Another update: Are you a knitter, if so watch this youtube knitting video. Do you identify with her? I do... haha!


Thursday, 16 February 2012

A pair of knitted socks.


The second pair of knitted socks - Tah Dah moment!

I've officially finished my second pair of socks (ever). They are great.

I can really see a good progression in even tension and the overall professional look of the socks (especially if I compare with my first pair!). I am very pleased with these and so is Mr C.

To see photos for each step of the way check out the stages:
  1. One sock finished.
  2. One down, one to go.
  3. One and a half...
  4. Then they were a pair!
It's taken me a couple of months, but it was well worth the trip. Go back and see how each stage progressed, especially if you want to find some good resources to help you with your socks.

Knitting socks is not as scary as it looks, have a go!

What's next?


I've already been working on a swatch for my next project, a waistcoat for Marmee. More on that soon! You can see the wool above - yummy no? :)

What are you up to?

Sunday, 12 February 2012

Etsy Stock Take - Week Six.


Etsy Stock Take - Week Six


UPDATE! Don't post your links here anymore, please click on the link to go over to the latest Etsy Stock Take! I plan to do this at the end of every calender week, so please look out for the newest post!
 

I got a custom order last week! Hooray! It's a sweet white crochet heart wedding ring pillow. I'm working on the item now, but I think that it could be appearing in my shop properly in the near future. It really is gorgeous!

Today's new item is another skinny bangle. This one is an apricot colour, not really neon, but bright enough to take on the trend I think. And it's a spring time colour I reckon (did you see my counter in the right column at the bottom? Well it's there just in case you were wondering how long is left till spring!!).

Can't wait to see what you guys came up with this week...

Kat x


Join me:

I hope that you fellow Etsian's will join me in showcasing your new items each Sunday (or anytime after that really!).  Let's blog hop!

You have 2 options:


1. Write a new post on your blog (telling us about your new items), title it Etsy Stock Take and link back here, using the Mr Linky Blog Hop widget thingy at the bottom of this post.

2. Post a link that goes directly to your new items in the Mr Linky Blog Hop widget thingy at the bottom of this post.

I will list the links to each week's stock take on my Etsy Stock Take page. Please go and have a browse!

It'd be lovely if you took a moment to go and check out some stuff that others post below. Let's show our support for each other craftwise!

I'm hoping that my goal of listing one item a week will be a powerful motivator and a source of promotion for us all...

 
What do you think?

Saturday, 11 February 2012

Joining Technorati and thinking about pets.

Pets that don't poo... do spiders count?
What blog directories are you a member of? Today I'm trying out Technorati... WVDDHW3FNZFE

On a completely unrelated note I would love to have a pet, a kitten or maybe a puppy would be lovely, thank you very much. Not very practical at the moment...


Thursday, 9 February 2012

Vintage Cars in Hamburg - VW Beetle with Skis.


Too cool!  Vintage motor and vintage skis!
I saw this last week in the east of Hamburg somewhere.

I was on my way through the city with the precious cargo of 4 x in-laws who had just flown into Lübeck Airport. Thankfully we were stopped at a traffic light and I could whip out my camera! Sis-in-law did a good job of getting the photo below. The vintage skis were so appropriate for the current big freeze weather we're having!


LOVE!

This is part of my new photography project: Vintage Cars in Hamburg. I now carry my camera wherever I go and I will collect pictures of old cars that I see while out and about. They just make me happy.

  1. Mini Cooper
  2. V.W. Beetle 

Any nice cars around your way?

Tuesday, 7 February 2012

My Top 7 Sewing Blogs.


My Top Seven Sewing blogs.

I love reading about what other people are making and I have learnt so much from them. I would like to give something back, so here is a little shout out to my favourites!

For complete beginners:
  •  There is a lovely round up of basic skills at A Beautiful Mess. If you poke around basic seams and hems are also described, but I can't seem to find them right now. The blog is quite lovely with a lot of other things too, vintage, fashion, hair etc. 
For intermediate sewers (like me):
  • Do you want to make a little cosmetic bag or a whole quilt? I do! Flossie Teacakes is here to help. With a down to earth vibe and a bit of mommy blogging on the side, this one is charming.
  • Jorth is just amazing for her talent of writing funny, entertaining and original posts. And they are all about her sewing projects. And cookies. And what kind of conversation your dress dummy might be having with your sewing machine while your back is turned!
  • Naughty Shorts is an inspiration to anyone that wants to sell their sewn items on Etsy, and has a simple whimsical summer style.
For those who really know what they are doing:
  • Gertie's New Blog for Better Sewing is a complete inspiration. Hardcore sewing, sleek and clean design and a vintage twist, it keeps me coming back for more. Gertie makes the best stuff! Her wardrobe must be a dream ;)
  • For smart sewing and bit of knitting mixed in, plus great sneak peeks into a fabulous vintage pattern library, Zilredloh is a must.
  • Last but not at all least, head over to Sewing by the Seat of my Pants for some real life sewing, the kind that we do in the little bit of time snatched from all the other stuff we have to get done!

PS. Are you into buying handmade? Yes? Then you should check out the amazing stuff in the Etsy Stock Take. If you sell your craft on Etsy, please come and join in :)


Follow Lifes Jewels on String


Sunday, 5 February 2012

Etsy Stock Take - Week Five

I'm going to make a white little heart for a custom order.

Etsy Stock Take - Week Five

UPDATE! Don't post your links here anymore, please click on the link to go over to the latest Etsy Stock Take! I plan to do this at the end of every calender week, so please look out for the newest post!


Oh my goodness, how does time fly? So the Etsy Stock Take was supposed to motivate me to fill up my shop with new items (apparently regular sales start around the the 100 items mark). Instead I've been completely distracted with other projects (monthly make and finishing the socks) and for another week I have nothing new to put in my shop. Grrr.

That said, I am excited to report that I have had an inquiry for a custom order! Hooray! I am going to make a white crochet heart with a ribbon to be a ring pillow for a wedding in May. How lovely is that?

Are you doing a better job at stocking your shop than me?!

Kat x


Join me:

I hope that you fellow Etsian's will join me in showcasing your new items each Sunday (or anytime after that really!).  Let's blog hop!

You have 2 options:


1. Write a new post on your blog (telling us about your new items), title it Etsy Stock Take and link back here, using the Mr Linky Blog Hop widget thingy at the bottom of this post.

2. Post a link that goes directly to your new items in the Mr Linky Blog Hop widget thingy at the bottom of this post.

I will list the links to each week's stock take on my Etsy Stock Take page. Please go and have a browse!

It'd be lovely if you took a moment to go and check out some stuff that others post below. Let's show our support for each other craftwise!

I'm hoping that my goal of listing one item a week will be a powerful motivator and a source of promotion for us all...

 
What do you think?
Saturday, 4 February 2012

How to: Sewing tubes for straps, ties etc


How to sew tubes for straps, ties etc...
I recently made a man apron and it came out very nicely. Making ties was one of the necessary skills, yet it seemed to take up a bit too much space on my apron post so I figured I would outline it separately. Never fear, it's rather easy, but just in case here it is:


1.
 
1. Pick some fabric. Plan the length of the strap/ties. Make a fold in the fabric, lengthways, checking the length. Measure several times along the fold to make sure that the width is even and cut the piece using the raw edge folded over as a guide.
Tip: Iron along the fold before cutting as it keeps everything in place.


2.

2. Flip the fold inside out so that the right sides of the fabric are touching and the wrong side is visible. Pin and sew along the cut edges. Then insert a chunky safety pin into one end.

3.

3. Pop the safety pin into the tube.

4.

4. Maneuver it along until it comes out the other end.

5.

5. Pull all the fabric through and iron once more.

Tah Dah! Lovely straps.

Friday, 3 February 2012

Joining ExpatWomen.com!

<a href="http://www.ExpatWomen.com/">Expat Women</a><br>

Ohhh, exciting! :)

A bit more handcream.


I've been making handcream again!

I did one batch with my Sis-in-law last week and then another batch today. I now know a bit more about handcream-making (click here for the original post and recipe).

Batch 2
  • To solve the not so perfect and professional (post-stirring) look we tried adding the lavender essential oil to the little containers and pouring the hot mixture on top. Then a quick mix while everything is still quite liquid. This way it cooled down with a smooth top. The downside is that some of the lavender oil probably still evaporates (as essential oil does when too hot), but hopefully not much. We can report that the cream still smelt lavenderish when it was finished!
  • To try and retain some of that lavenderishness we closed the lids of the pots before the cream was cool. This wasn't a good idea as we ended up with some liquid separation. I think it was the aloe vera  gel which was also added while the mix was hot. Perhaps re-melting and mixing again would help. 
Batch 3

  • I couldn't be bothered with the in-the-oven sterilisation process for the glass today. But as I was also using some smaller plastic pots, I used a bigger saucepan and just bunged everything in the hot water letting it boil for a minute or two to get them really clean. Update: Do not sterilise plastic pots in this way! The heat warps them, although impossible to see, when you try to close them the threads don't line up anymore. Very disappointed, I ruined them. Don't make the same mistake!
  • Again I mixed in the aloe vera gel when my mixture was hot. This time I let the cream cool with the jars open. There was still a little separation, but much less than batch 2. I think it's a good idea to add less aloe (so far I've put in a generous splash, might try a stingy one next time!) or to omit it unless I add it  and mix it in when the mixture is cooler...but then I don't get the pretty smooth top...Mmmmm...
  • I was hoping to make some coco lip balm today, but my new glass pots are quite big and swallowed up all my mixture! I will try next time (see updates below!).
Updates:
  • I made another batch, this time using 20 drops of Orange essential oil in about 100g of cream (I mixed it directly in the jar). Smells like chocolate orange! 
  • And I had a tiny bit of the plain mixture left over so I melted in some coconut oil and then tipped it into an emptied out old vaseline jar. Mmmm... It's more of a vaseline type texture because of the extra oil: Please welcome my new Coconut Lip Salve :)
PS. Are you into buying handmade? Yes? Then you should check out the amazing stuff in the Etsy Stock Take. If you sell your craft on Etsy, please come and join in :)


Follow Lifes Jewels on String


Thursday, 2 February 2012

How to: Handmade Man Apron.

Make me!


Handmade Man Apron in 10 Easy Steps.

This is my response to the January monthly make and a lovely sew one thing a month sew-a-long which I have temporarily lost in blog land, will update when I find it.

A nice easy project for January to ease me into things. Very customisable too. 

If you want to make one read on. 

If I'm reading these notes while making another one some time in the future - hello me!

You will need:
  • A loved apron (already in existence).
  • Fabric (Cotton is good cos it's hard-waring and washes well).
  • Sewing stuff -pins -scissors -sewing machine -thread -iron
1.

1. Fold your fabric and fold your apron in half longways. Lay one on top of the other. I laid my fabric out with the selvedge edge at the top as it was nice and fluffy and also because then I wouldn't have to hem that bit. (Please do not forget to lay the fold of the fabric under the fold of the apron - very important!).

2. Measure any extra length (if you want it). I added about 20cm to the bottom. I also decided to make a curve at the top sides instead of the square shape of my apron.

3.

3. Cut around your apron incorporating your adjustments. Unfold and admire. 


4.
4. Pin down the edges for hemming. I had wanted to use my hemming foot on my Bernina at this point, but discovered that my fabric was too heavy, so used the normal foot in the end. To make this bit easier I folded the edge once (about 5mm) ironing the fold as I went, then folded again (another 5mm), also ironing it down. Then I had a nice tidy edge to pin and sew. Go ahead and sew them down.

Tip!
 
TIP: If you put the pins in with the heads facing you as you sew, you can pull them out easily as you go. No need to tack (baste).

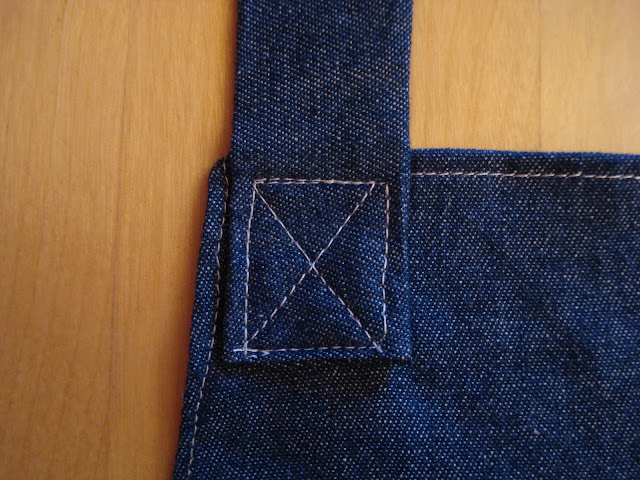
5. Make 3 tubes, for the 2 ties and the round the neck bit.

6.

6. Fold in untidy ends of the ties and pin them into place.

7.

7. Sew them on.

8. Do the same with the round the neck thingy, measuring it up using your old faithful apron.

9a.

9b.

9. Pretty it up a little (only a little cos it is a man apron). If you are making a girl apron go to town!

10.

10. Get a man to model it for you!

If you do make one please leave me a link to a picture so I can see it, would love to share!

What are you sewing these days?

PS. You might have noticed that my blog changed colour about 5 times today... I'm desperate to improve the background style, but I'm afraid it is a work in progress! Hang on in there with me :)

Related Posts Plugin for WordPress, Blogger...