 |
| Homemade Deodorant |
Recently I have been exploring the idea of producing my own cosmetics. I have some skin issues and a desire to solve them has prompted research into ingredients which help and ingredients that harm.
Type homemade deodorant into google and you will find a million links explaining the dangers of using commercial deodorants as well as how to make your own. I found it a bit overwhelming. In the end I chose the positive over the negative, glossing over the scare-mongering articles and focusing on the recipes.
The most useful reference I found during the research phase was Passionate Homemaking. I appreciated the experiment that led up to their deodorant recipe, I like the way it organically grew over some time resulting in the final result. I would love to be able to come up with my own products in a similar way (I'll certainly be more thoughtful about my 'making stuff' process in future).
 |
| Homemade Deodorant Ingredients |
Ingredients (German in brackets):
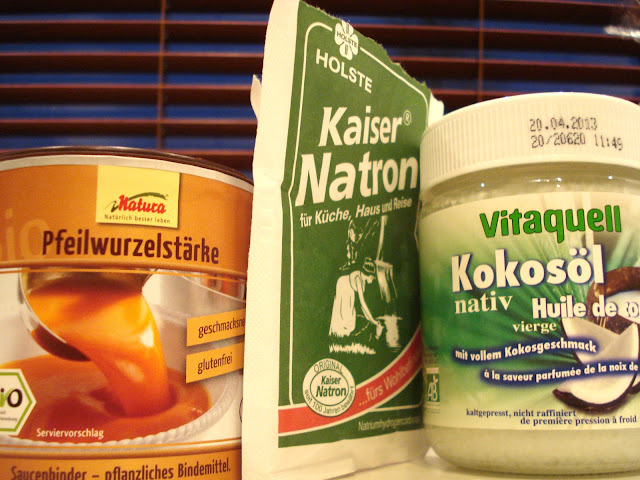
1 part arrowroot powder (Pfeilwurzelstärke)
1 part bicarbonate of soda (Natron)
3 parts coconut oil (Kokosöl)
What I did:
2. I then added 6tbsp of coconut oil and started working it all together with the back of a spoon.
3. I kept on going for a few minutes until the mixture was homogeneous.
4. Finally I put the whole lot in an upcycled sterilised jam jar.
 |
| Making homemade deodorant, part way mixed |
What I learnt:
- I suppose you could add a bit more oil if it's too dry, or a bit more of the dry ingredients (in equal amounts) if it's too wet.
- Working the mixture together doesn't work so well with a fork (she says from experience!).
- Putting the mixture in the jam jar works better with the back of a spoon too.
The verdict a few days later:
I've been using my new deodorant exclusively for nearly a week now.
I like it!
- It goes on easily (scrape a bit out of the jar with the back of a fingernail as it melts to the touch of skin).
- It's a little grainy when you put it on which was initially disappointing, but not a deal breaker.
- I used to wait for my commercial liquid deodorant to dry, so I do the same with my homemade version, letting it soak in.
- Doesn't smell strong and holds out all day (even the stressful first day back at work yesterday!).
Update in September:
- I used this deodorant exclusively for 6 months (January to June) and was very happy with it, having no skin issues the whole time.
- Then the weather started to get warmer. And I went back to full time work. And I wimped out a bit! I started to use commercial deodorant for my work days (teaching) and using my coconut deodorant for my off days. This worked a treat.
- After about 7 months the deodorant started to smell a bit funny and I didn't enjoy using it so much. I threw it out thinking the coconut oil had reached its use by date. Which is a shame, because I still had LOADS left. I've just checked the original coconut oil container and the oil is still good for another 6 months. And the arrowroot powder is good for another year. Maybe I acted prematurely with the throwing out act... Ooops...
- I will definitely make more of this, but in a smaller quantity so I can use it up before it turns.
Are you gonna give it a try? Got any tips to share?
PS. Are you into buying handmade? Yes? Then you should check out the amazing stuff in the Etsy Stock Take. If you sell your craft on Etsy, please come and join in :)

I love your article about the homemade deodorant. I'd been thinking about making my own for a long time now and you just did the research work for us. Thank you! Now, do you think that mixing in a few drops of organic tea tree oil or other balsamic oils would be all right? I'm thinking about different smells...
ReplyDeleteThank you! You reminded me about this post and I have just added an update. Please let me know if you try out this recipe :)
Delete